Unlocking Testnet Tokens: Your Ultimate Guide to Finding Testnet Faucets on Arbitrum


During a Web3 hackathon where I was a mentor, the question of where to get a faucet for Arbitrum kept popping up. I used to recommend Alchemy, but they changed their criteria, making it trickier. Seeing them struggle, I thought, "There's gotta be a better way." That's when I decided to take matters into my own hands and create a Faucet Locator website and this Blog Post.
What will we do?
In this tutorial, we'll explore how to obtain a testnet faucet on Arbitrum, allowing you to access test tokens for your development needs. Whether you're building decentralized applications or experimenting with smart contracts, having access to test tokens is essential for testing and debugging your code.
Requirements
Metamask or Any Ethereum Wallet
Access to Faucet Locator
Sepolia ETH if you want to use Arbitrum Bridge (Optional)
What you will learn?
What are testnet faucets?
Why do we need a Faucet?
Gas Fee
Where to find faucets?
How to bridge your Sepolia ETH to Arbitrum Sepolia?
What are Testnet Faucets?
Faucets provide us with small amounts of test tokens that can be used for interacting with the blockchain, making transactions, deploying smart contracts, or testing them.
Why do we need a Faucet?
Interacting with any Ethereum/Arbitrum app would require some native token to pay for the gas fees so that the nodes include your transaction in the block. These fees are
To tackle the problem, protocols run a separate testnet chain where developers can play around and deploy their smart contracts and interact with them. Also, these testnets can be used for running network updates before the actual blockchain to get vulnerabilities.
Gas (For those interested)
Gas fee refers to the unit that measures the amount of computational effort required to execute specific operations on the Ethereum network. It is a virtual fuel used to power the smart contracts.
Base Fee - The base fee is the price paid by the sender to reserve the inclusion of transactions in the block. It depends upon the previous block size and increases by 12.5% per block if the target block size is exceeded. This fee is burned upon the mining of the block.
Priority Fee - A priority fee is paid to the miners as a tip to include the transaction in the block. For transactions that need to get preferentially executed ahead of other transactions in the same block, a higher tip will be necessary to attempt to outbid competing transactions.
Transaction Fee - It is the fee used to make transactions on the Ethereum network. It is the overall fee paid by the user.
Transaction fee = Base fee + recommended Priority fee
This Transaction fee is what we call the Gas fees.
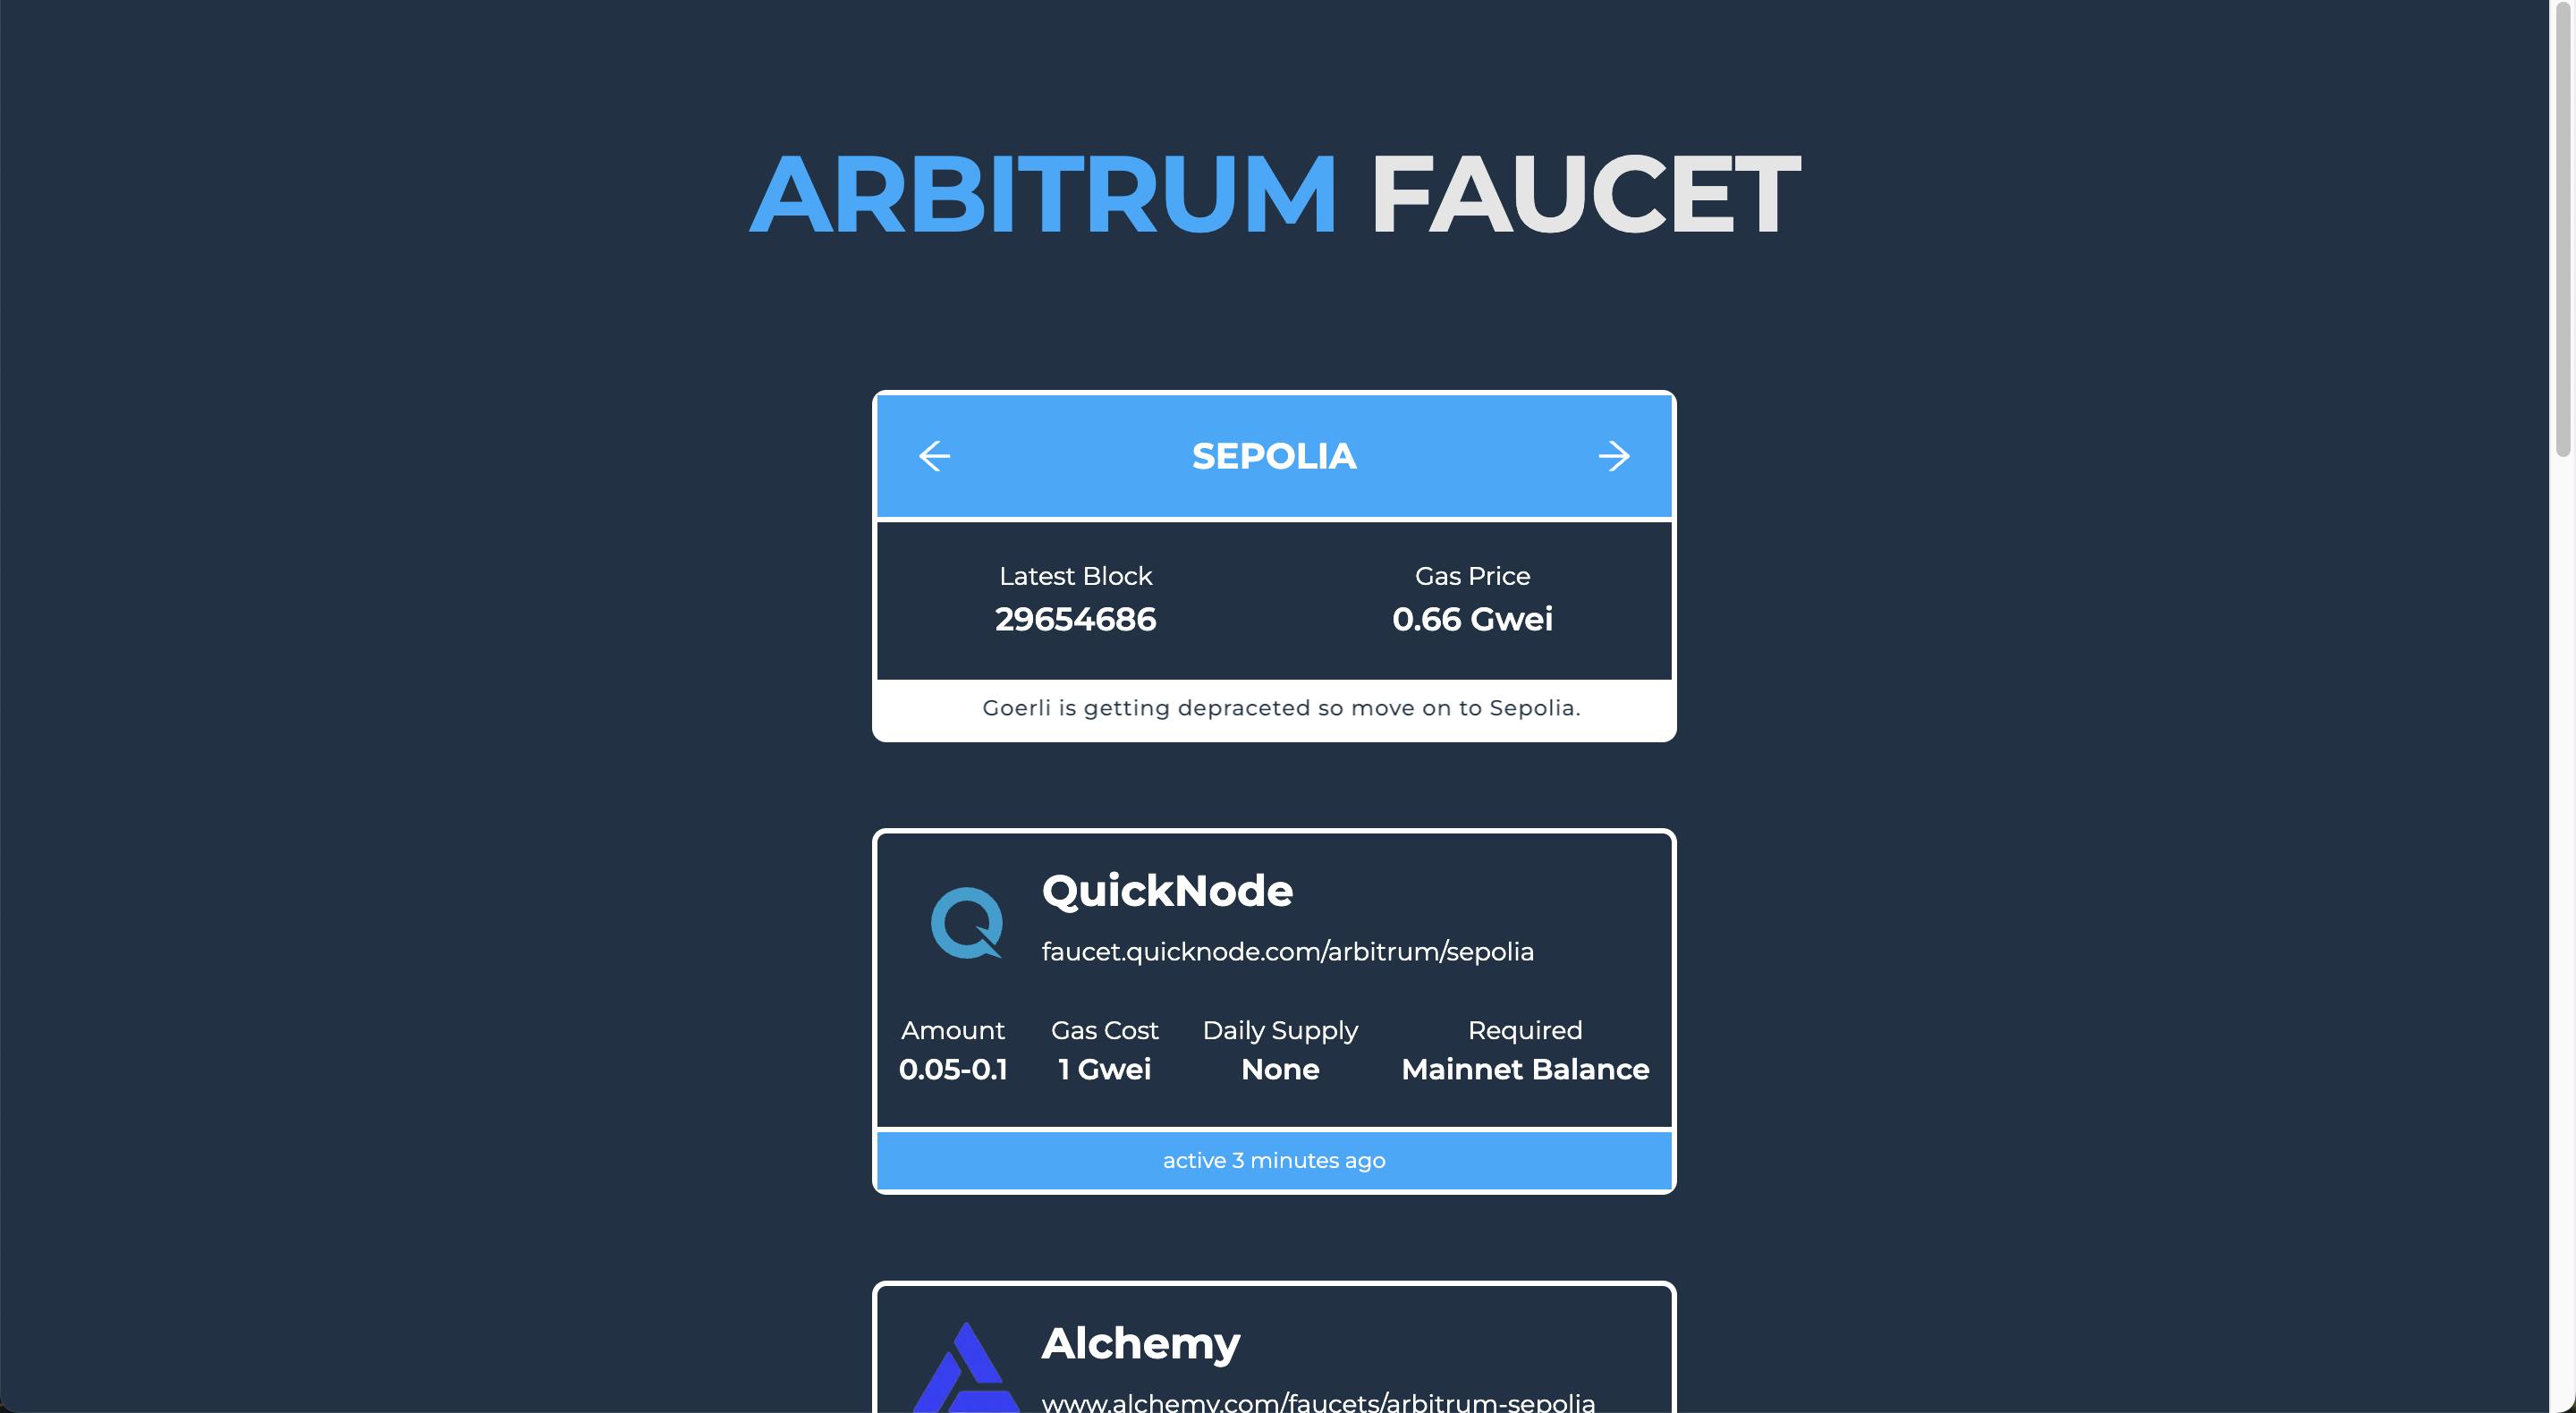
Exploring Faucet Locator Website
As a helpful resource, I have created a faucet locator website where you can easily find and access testnet faucets for Arbitrum Sepolia and Stylus. Just visit Arbitrum Faucet Locator and select the desired network.

You can explore the active faucet providers, where you'll find essential details such as the amount of tokens you'll receive and the requirements for obtaining them. Clicking on the link will lead you directly to the faucet provider.
Alternatively: Bridging Sepolia ETH to Arbitrum
If you wanna do it as a pro and also have some Sepolia ETH, I'll also walk you through bridging Sepolia ETH to Arbitrum Sepolia. This process involves transferring test tokens from the Sepolia Ethereum testnet to the Arbitrum Sepolia testnet, allowing you to access Arbitrum's ecosystem.
Let's get our hands dirty
Get the Sepolia ETH - Make sure you have the Metamask Wallet with Sepolia ETH to start with the next steps.
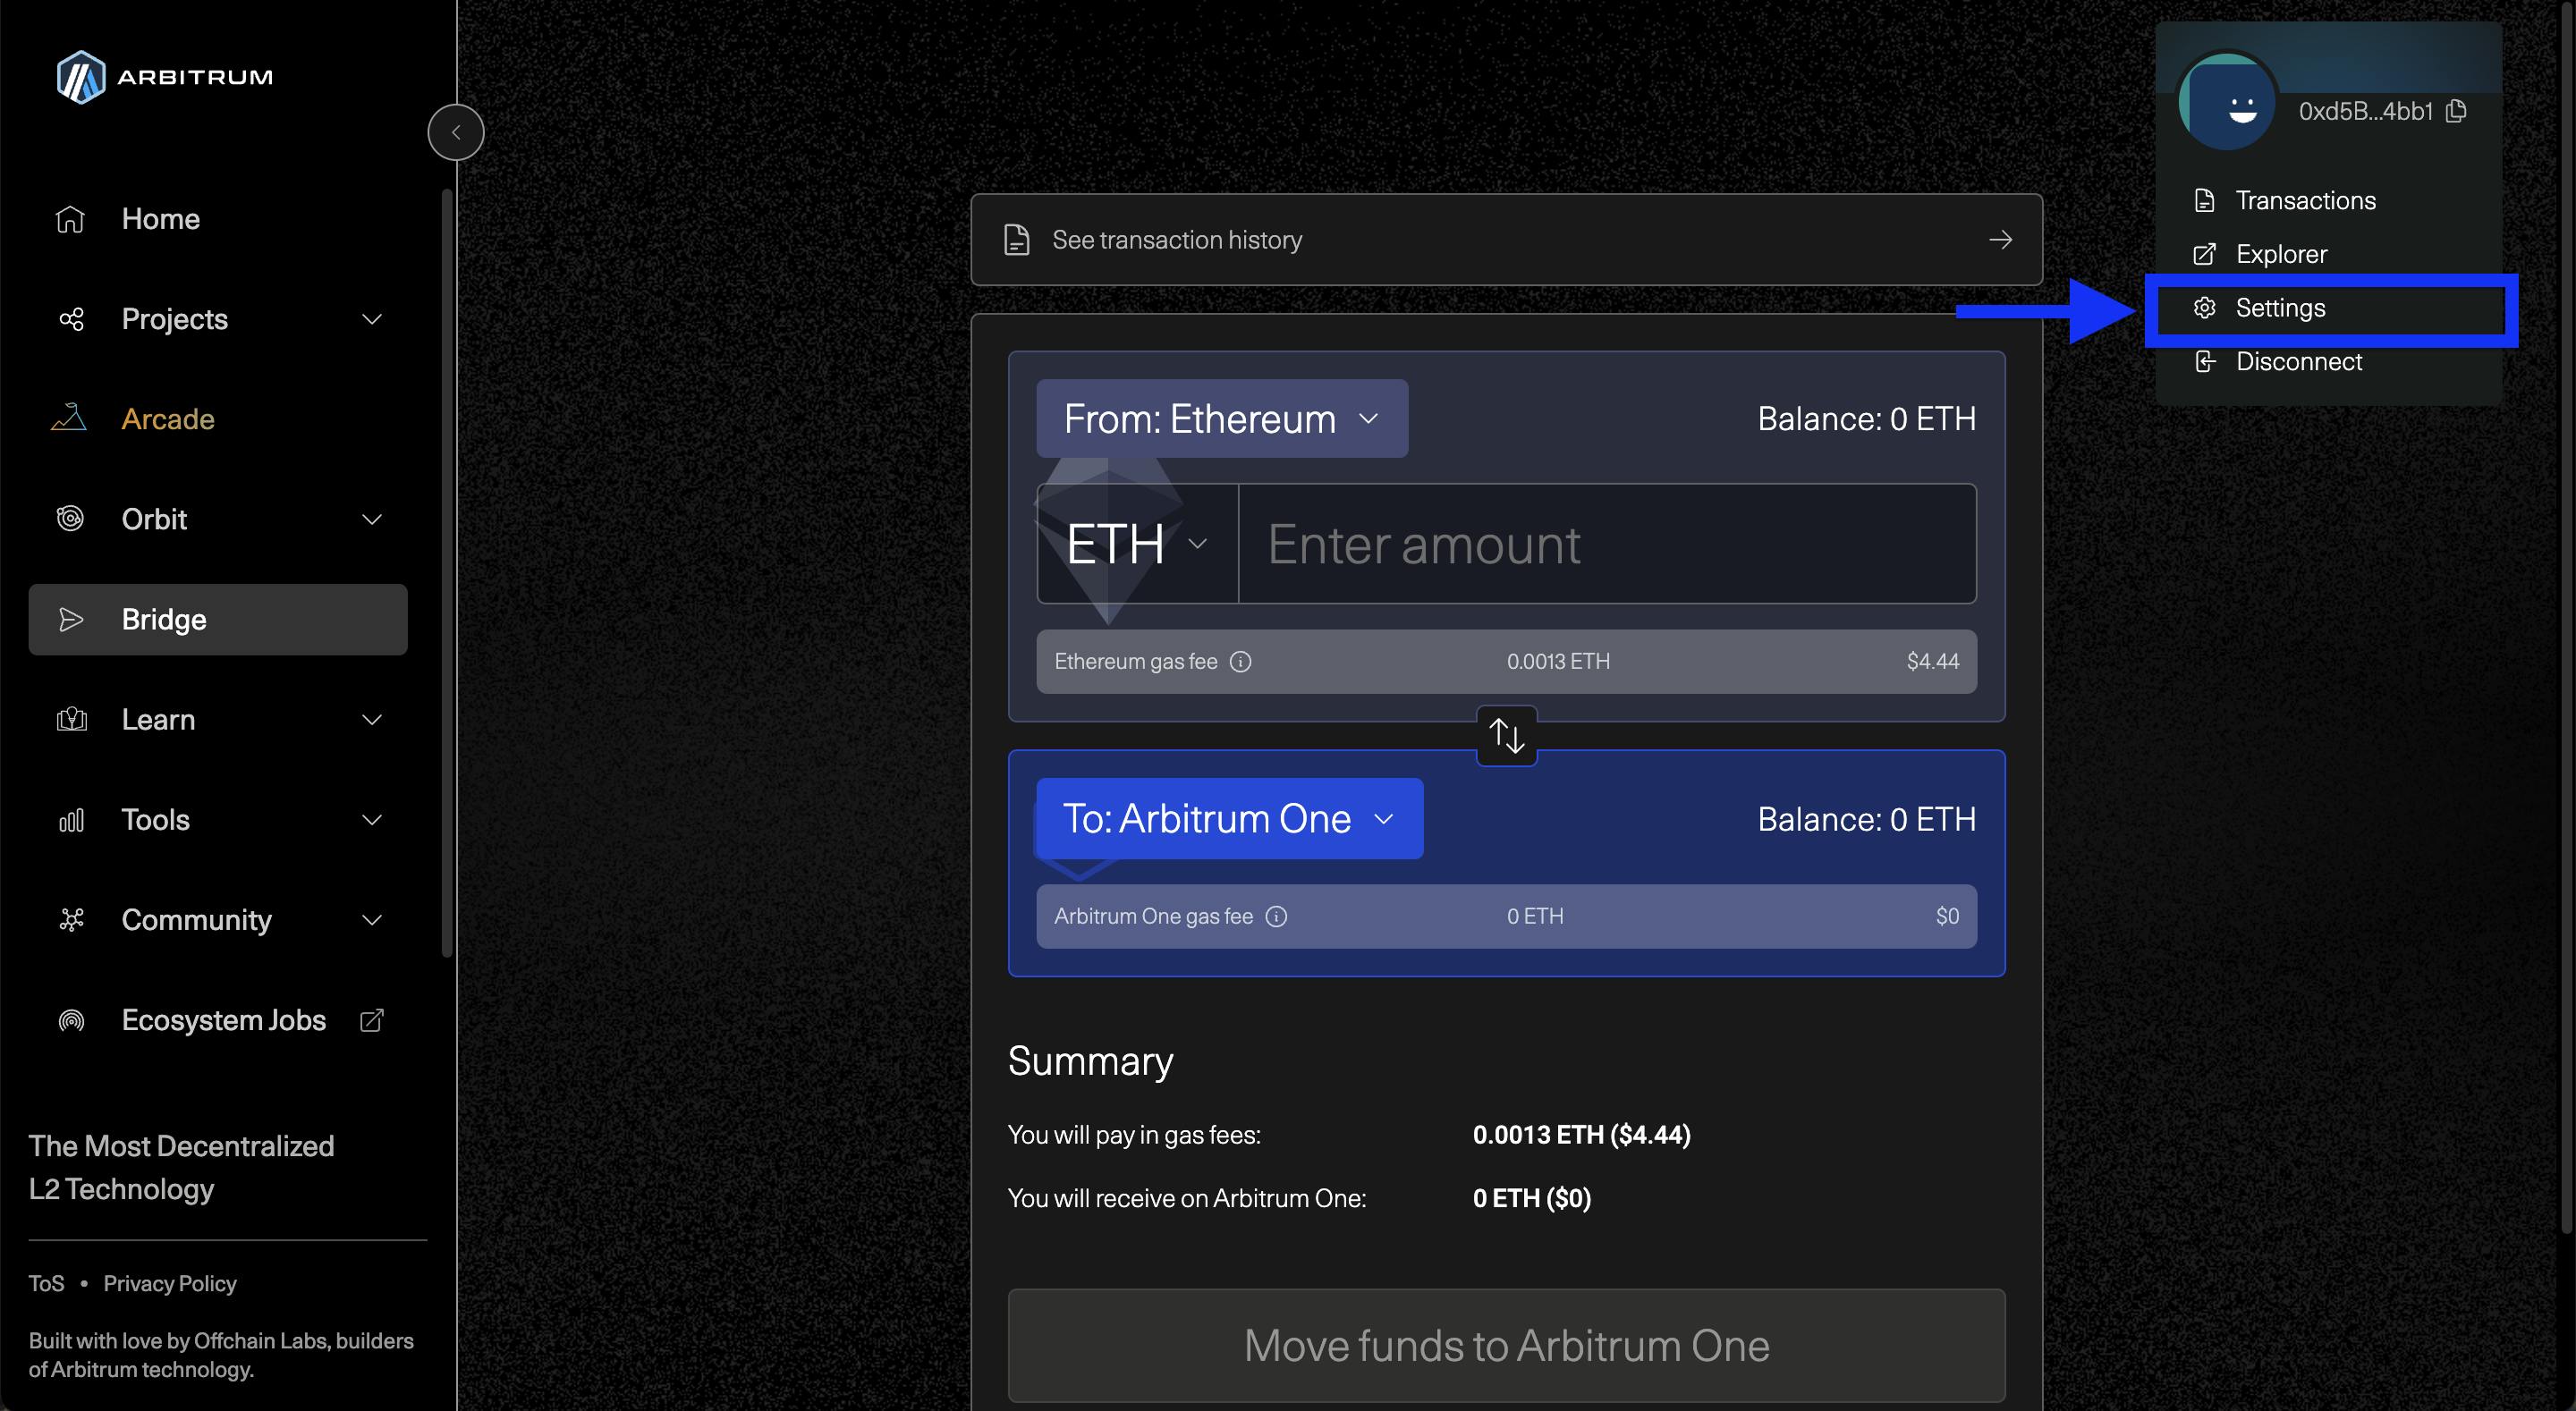
Arbitrum Bridge - Visit the Arbitrum Bridge and connect your Ethereum wallet when prompted. Once your wallet is connected, click on the Wallet button showing the address.

Open the Settings
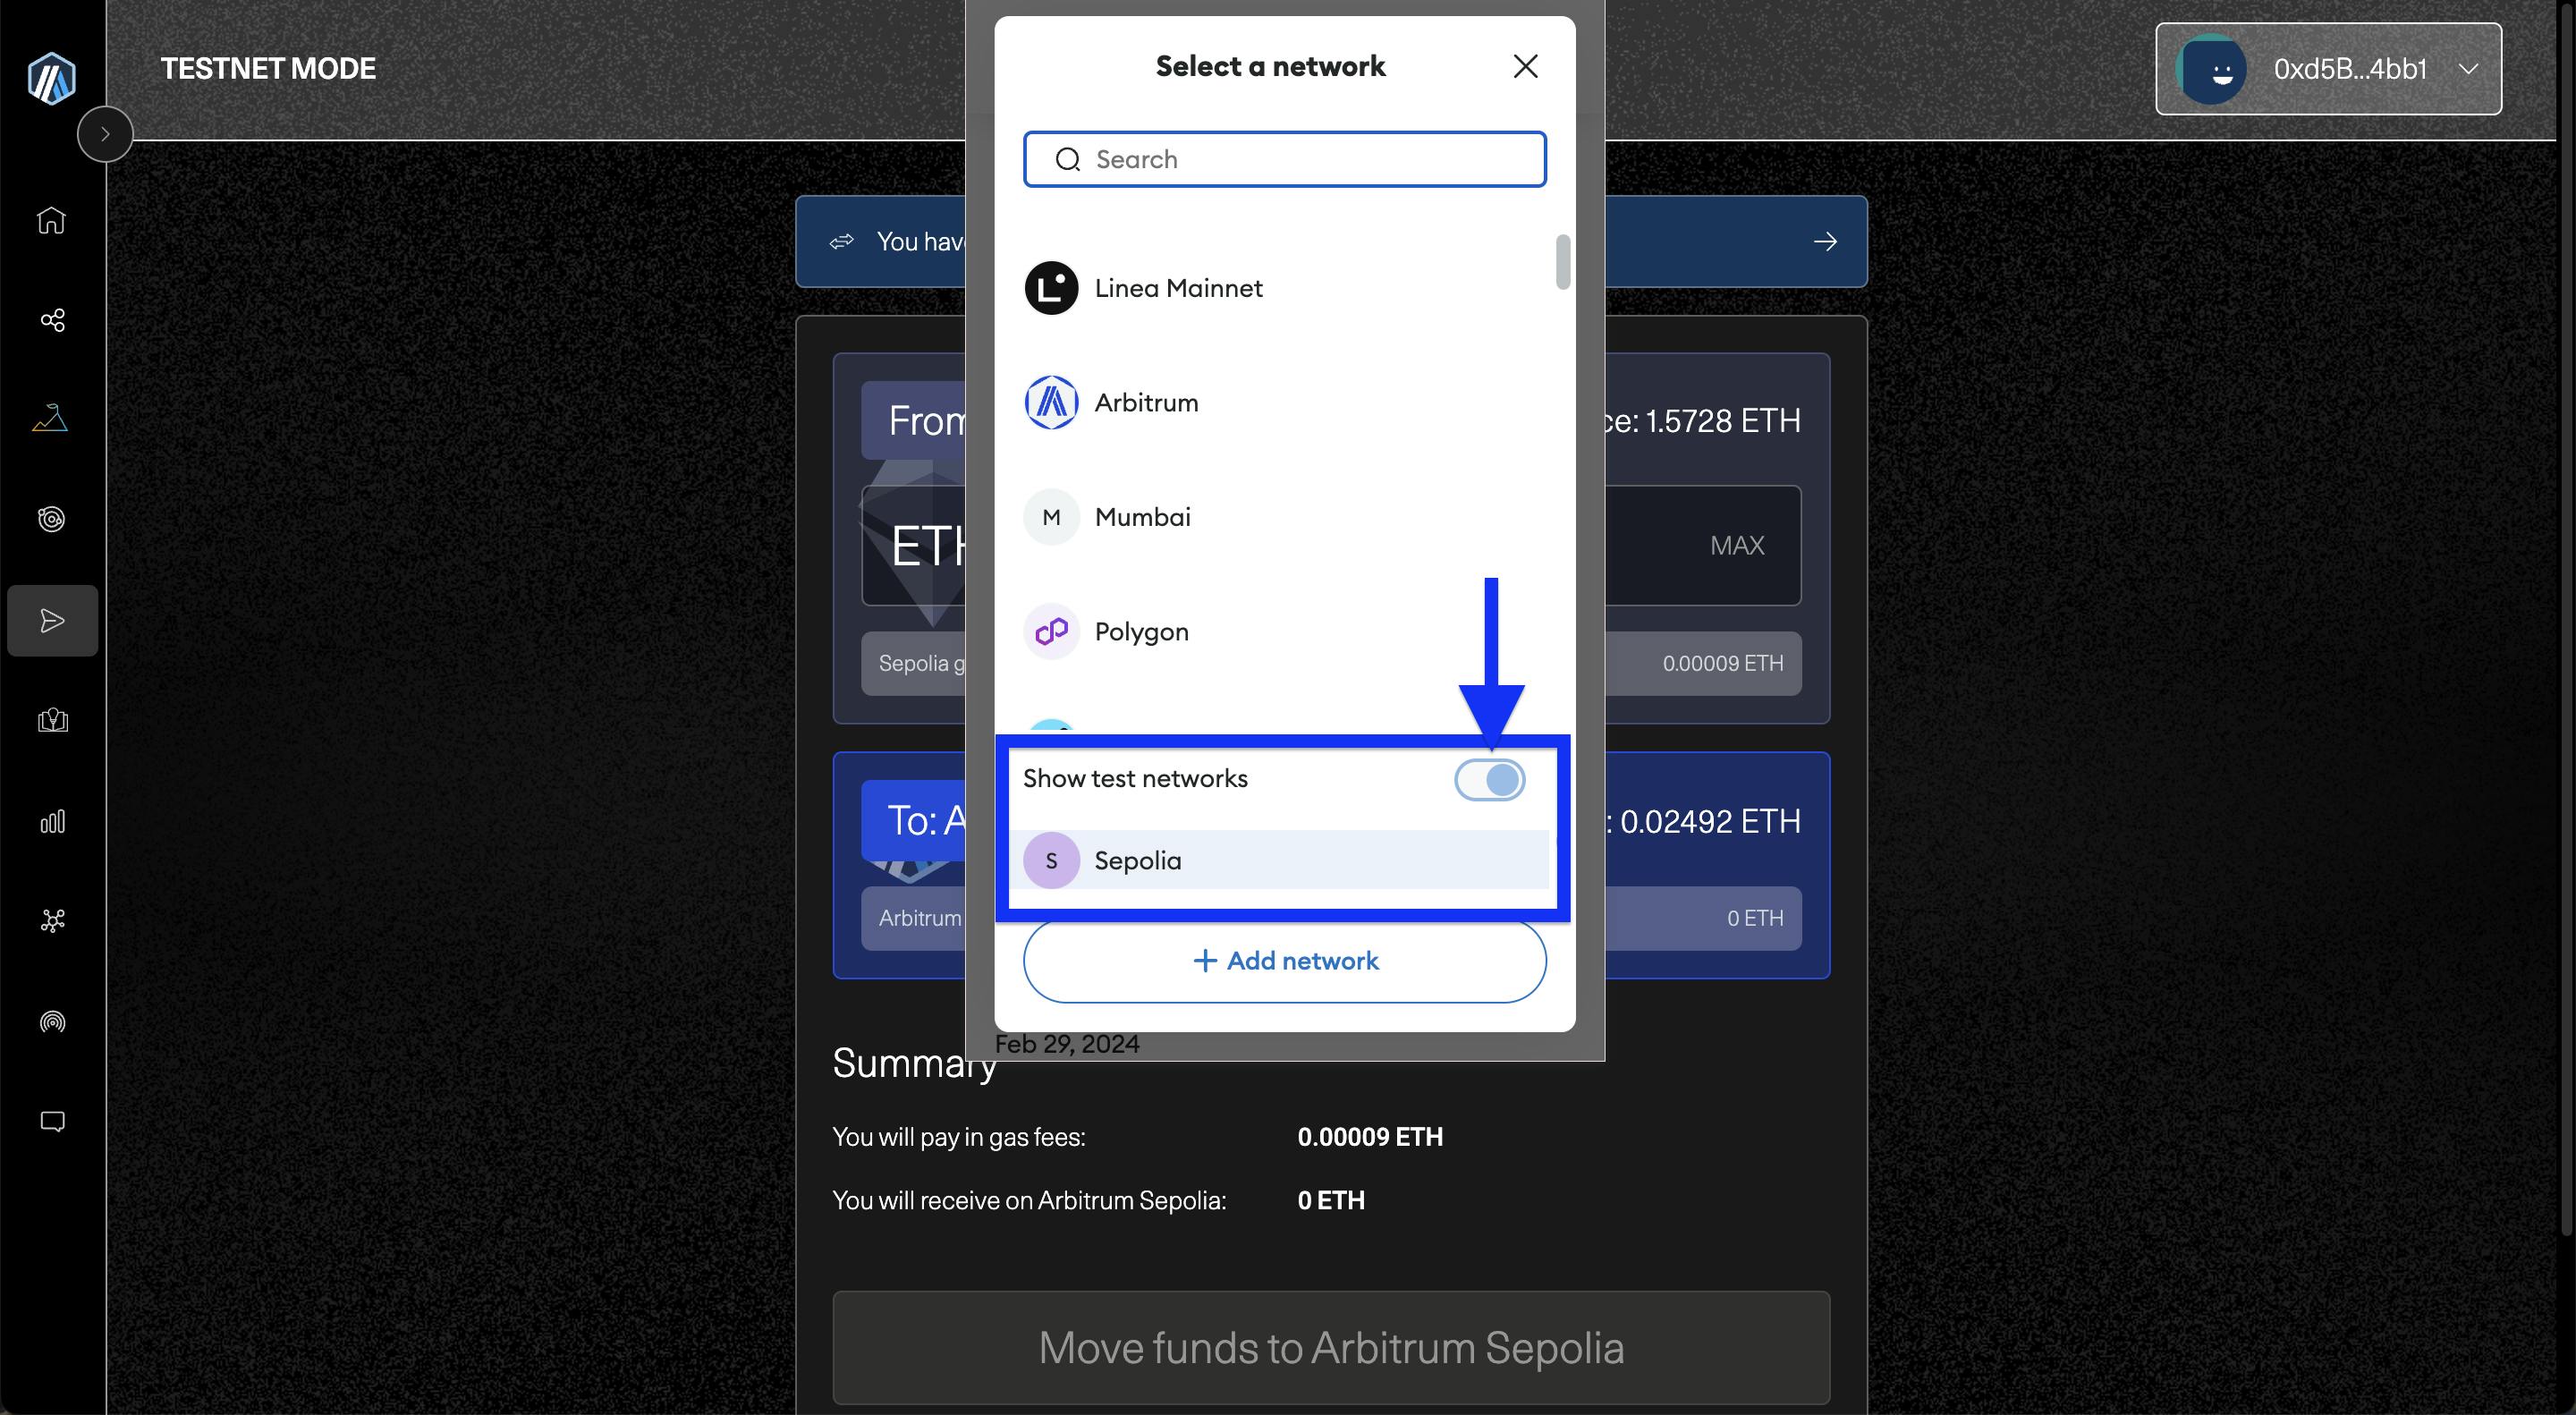
Now Turn on the Testnet Mode under Developer Mode to bridge on the testnet.

If you haven't changed the network yet, switch it to Sepolia on your Metamask or wallet. If you don't see it, click on Show Test Networks.
Enter the amount of ETH you wish to bridge to Arbitrum, then click on Move funds to Arbitrum Sepolia. Ensure you leave some ETH to cover the gas fee, as discussed earlier.

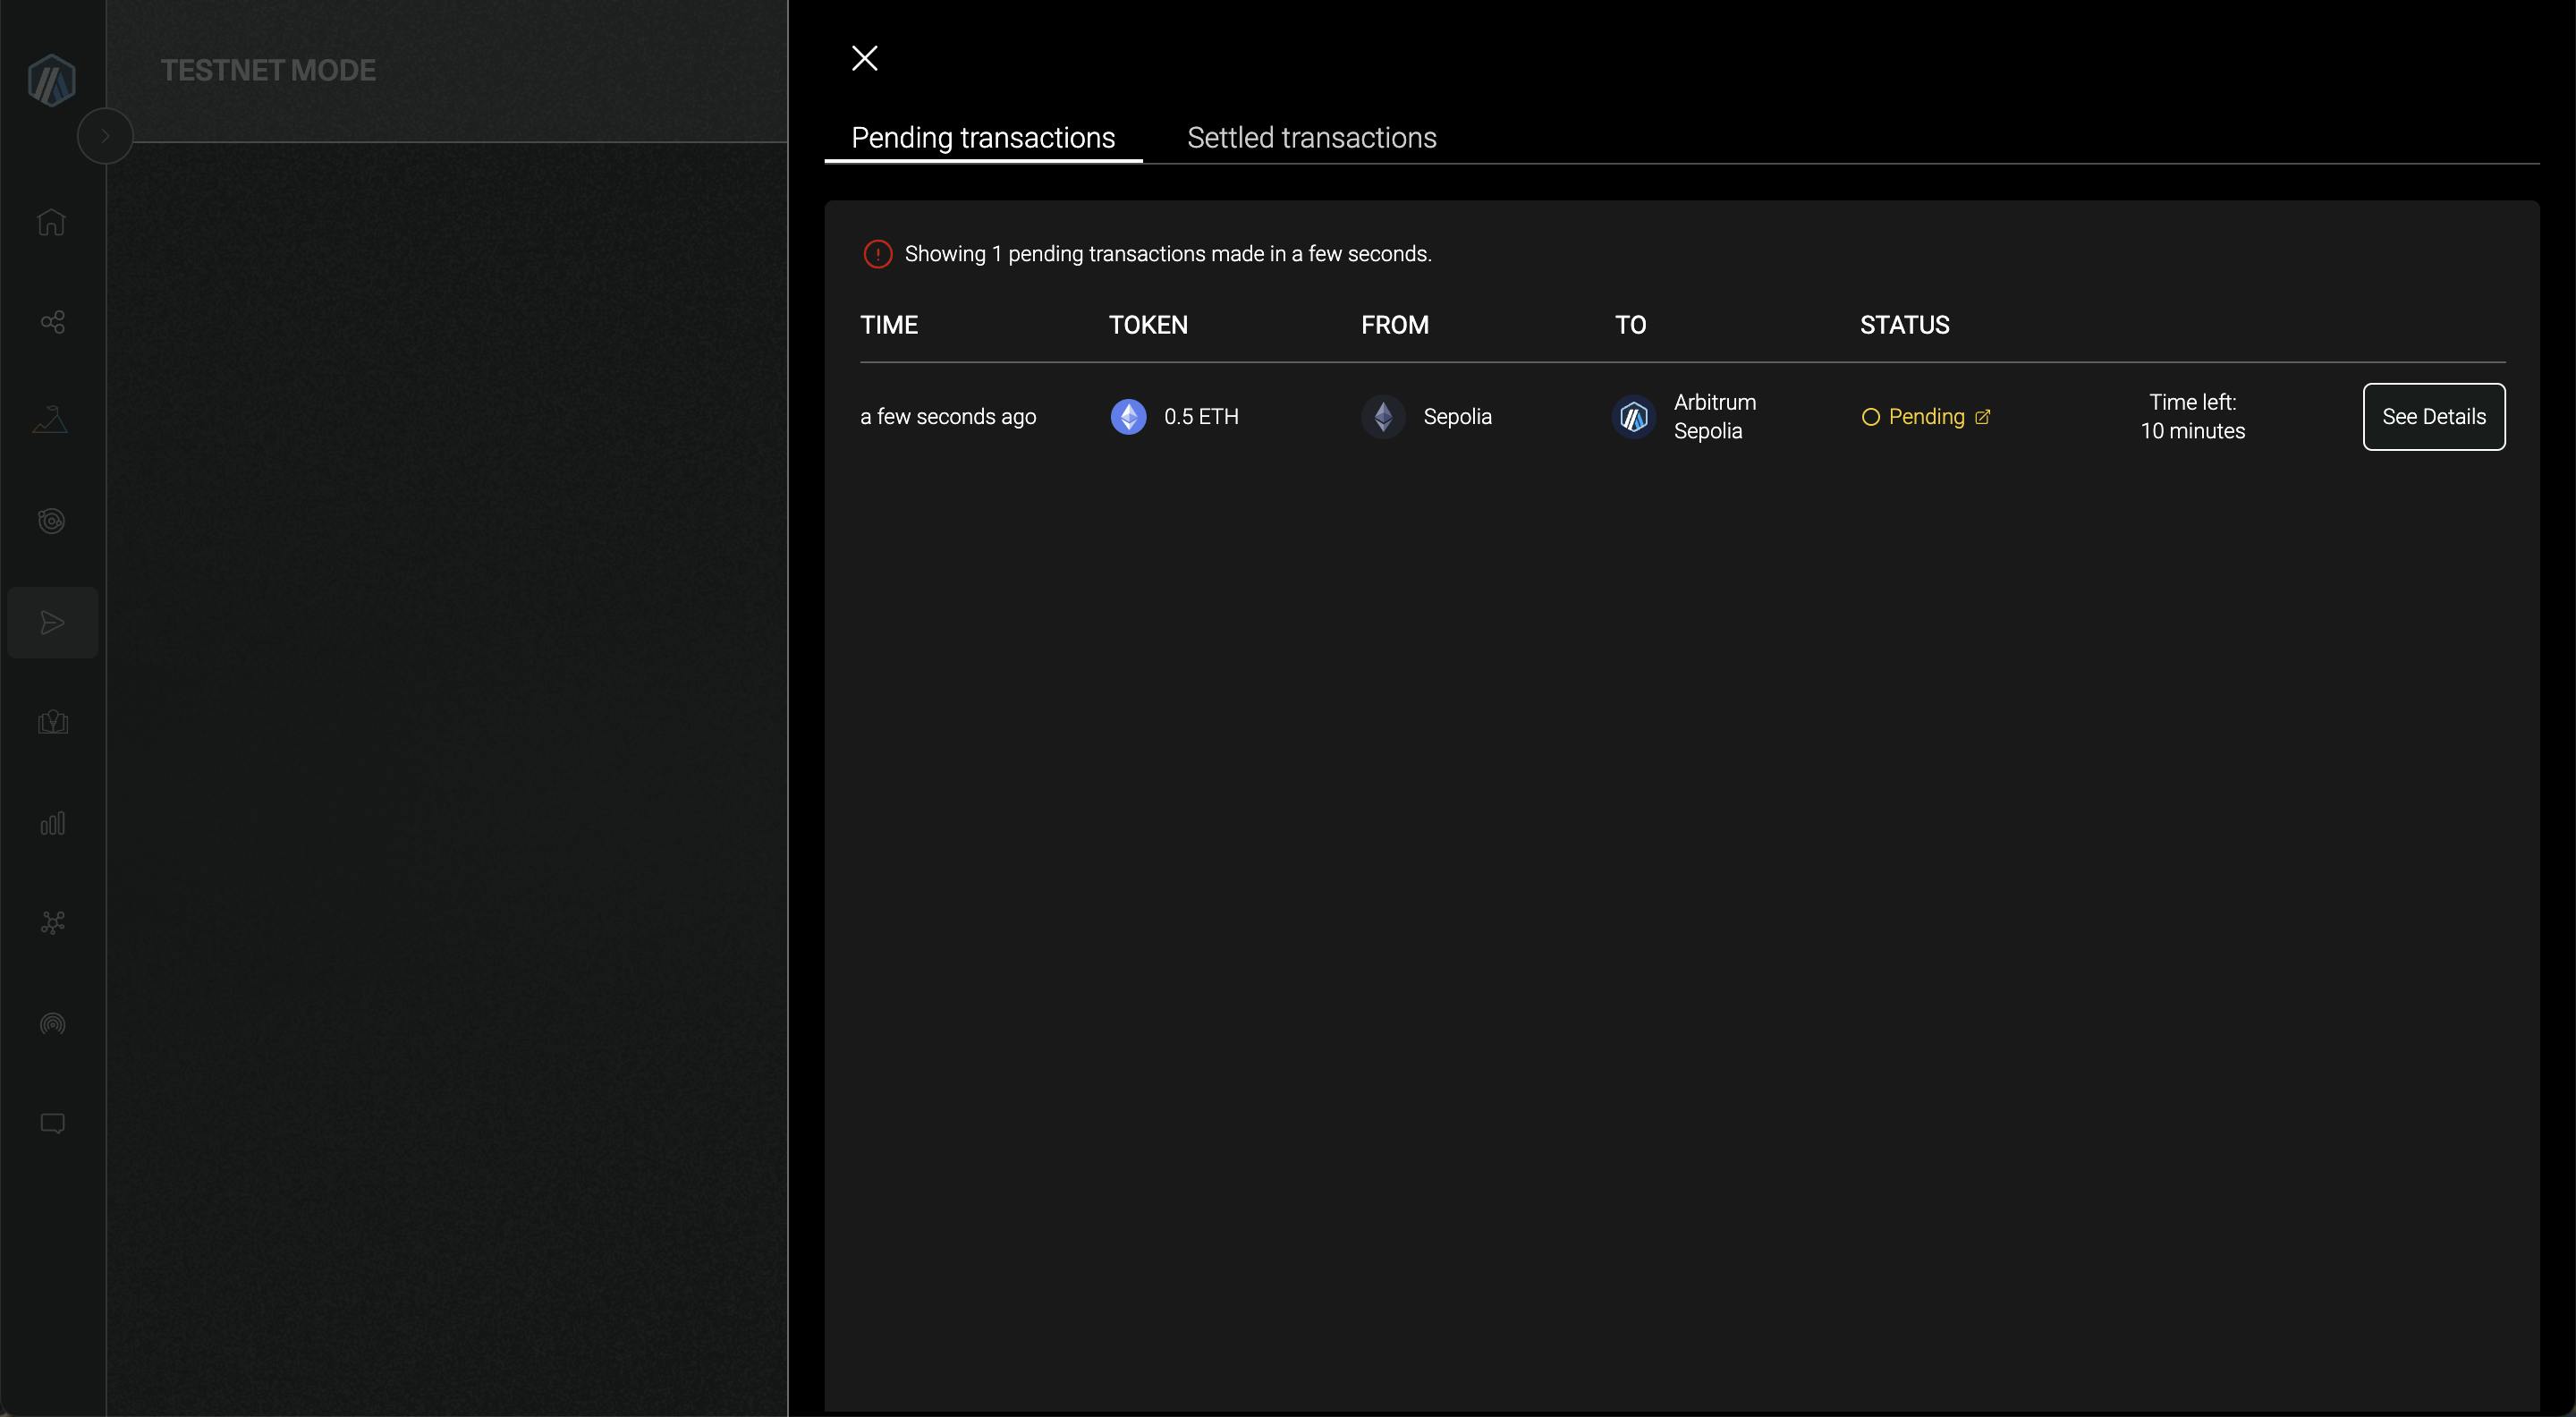
After signing the transaction, you will see this dashboard. It will take approximately 10-15 minutes to bridge on the testnet.
After the transaction is confirmed, your funds will be successfully reflected in your wallet on Arbitrum Sepolia Network. If you don't have this network added to your wallet, you can do so by visiting chainlist.org.

You can do the same to bridge the Sepolia to Arbitrum Stylus or XAI or vice versa.
Check your Progress
Congratulations on completing the tutorial! Here's a summary of what you've achieved:
You've gained insight into the significance of testnet faucets and learned how to obtain them on Arbitrum.
You've also learned about the importance of gas fees and how they are calculated.
Additionally, you've acquired practical skills in bridging Sepolia ETH to Arbitrum Sepolia, expanding your access to the Arbitrum ecosystem.
Conclusion
I encourage you to continue exploring and experimenting with Arbitrum. Keep building, learning, and innovating in the exciting world of Web3 development!
Report any bugs or want to contribute? Faucet Locator.
Connect with me on Twitter, Farcaster, LinkedIn, and GitHub.
Thank you for Reading :)